
I first hit 3DCellForge while trying to cut down the back-and-forth between reference images and a usable GLB. Manual tweaking in Blender was eating my afternoon. 3DCellForge runs in the browser, accepts an image, and hands back a GLB through cloud backends like Hyper3D, Tripo, and Fal.ai.
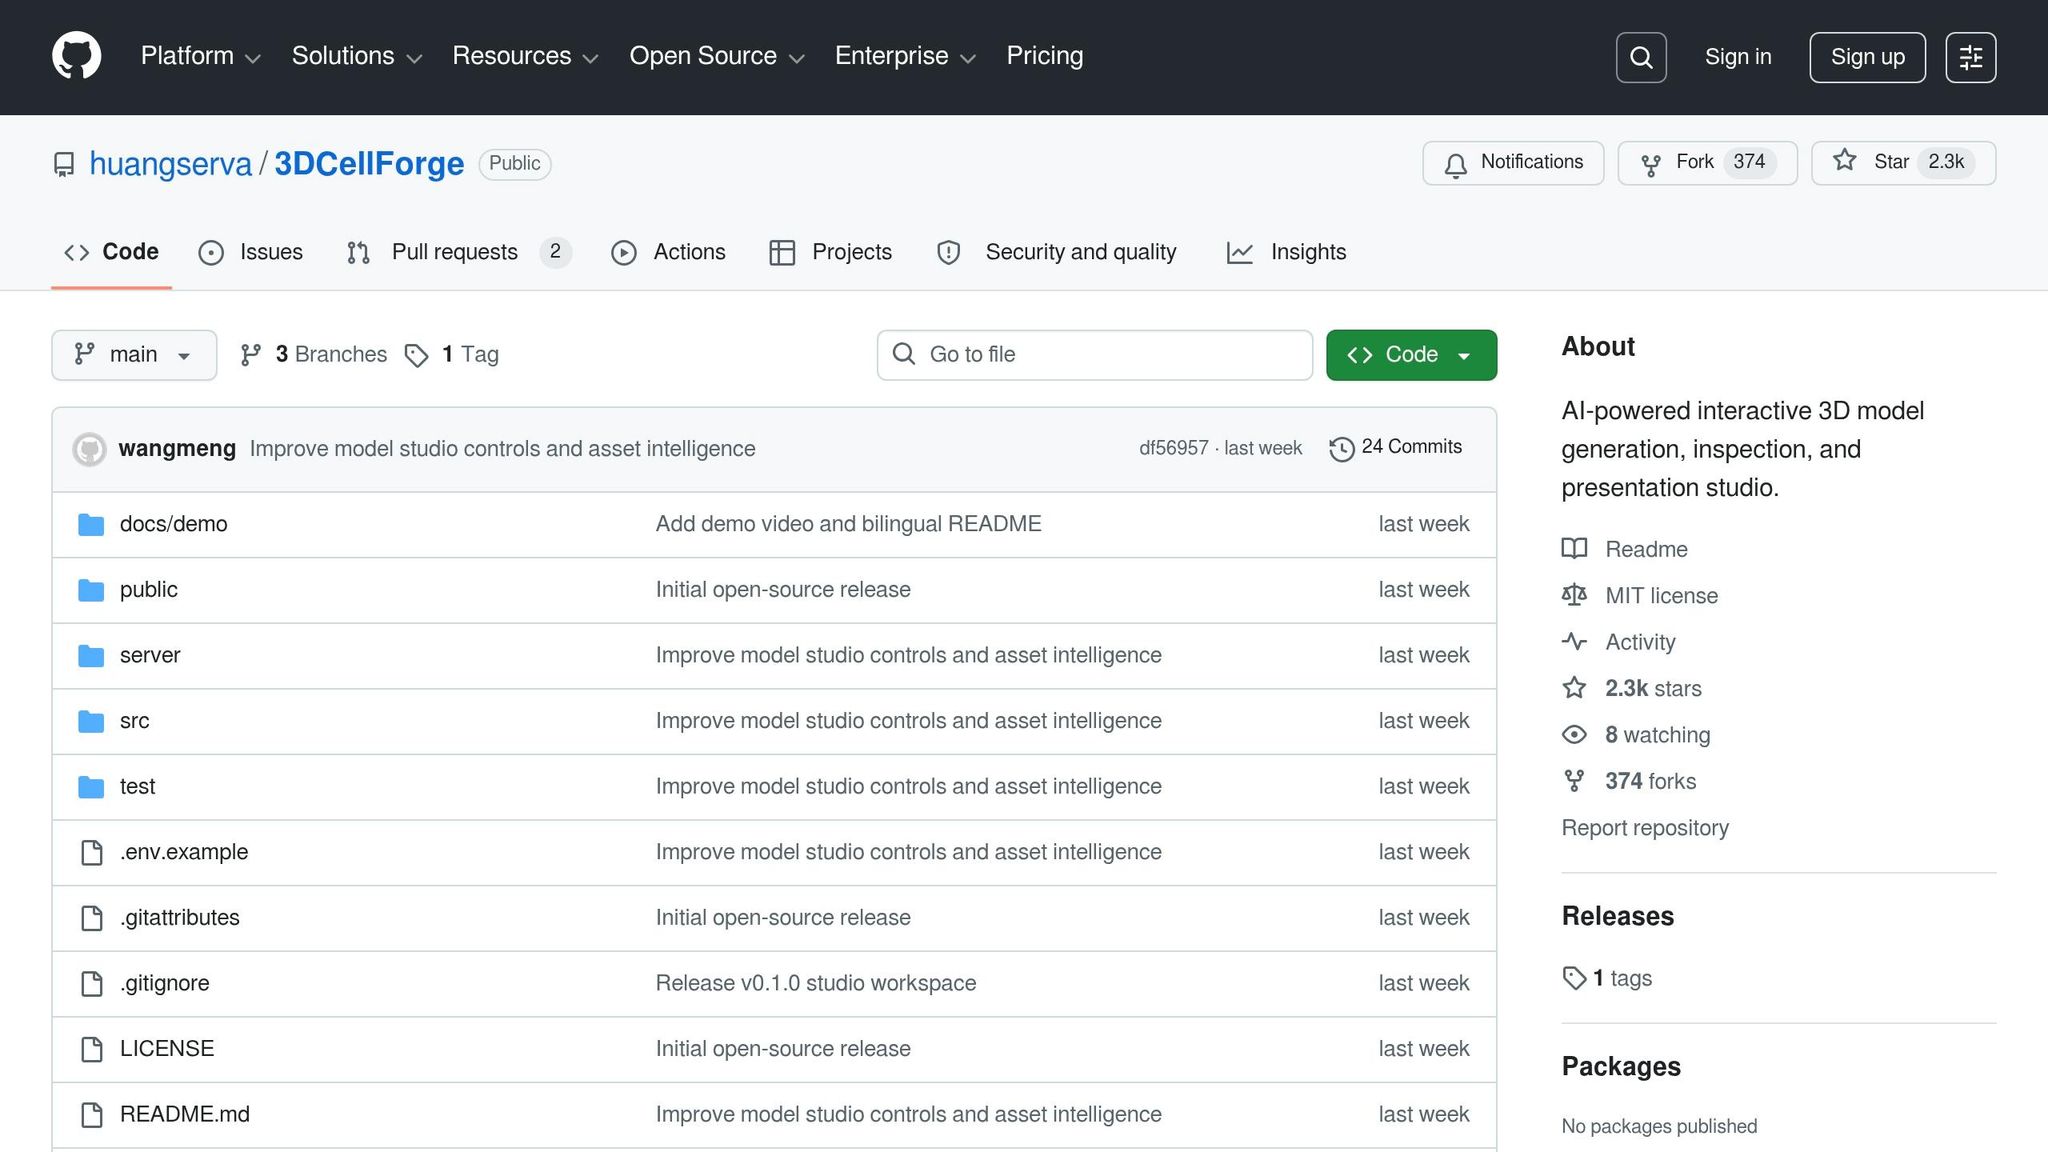
No install, no subscription, and a clean React UI. The repo crossed 2.1K stars in May 2026 (up from 1.8K when I first looked). This post covers what works, where it breaks, and whether it deserves a slot in your pipeline.
Image to 3D world workflow
Core features and technical architecture
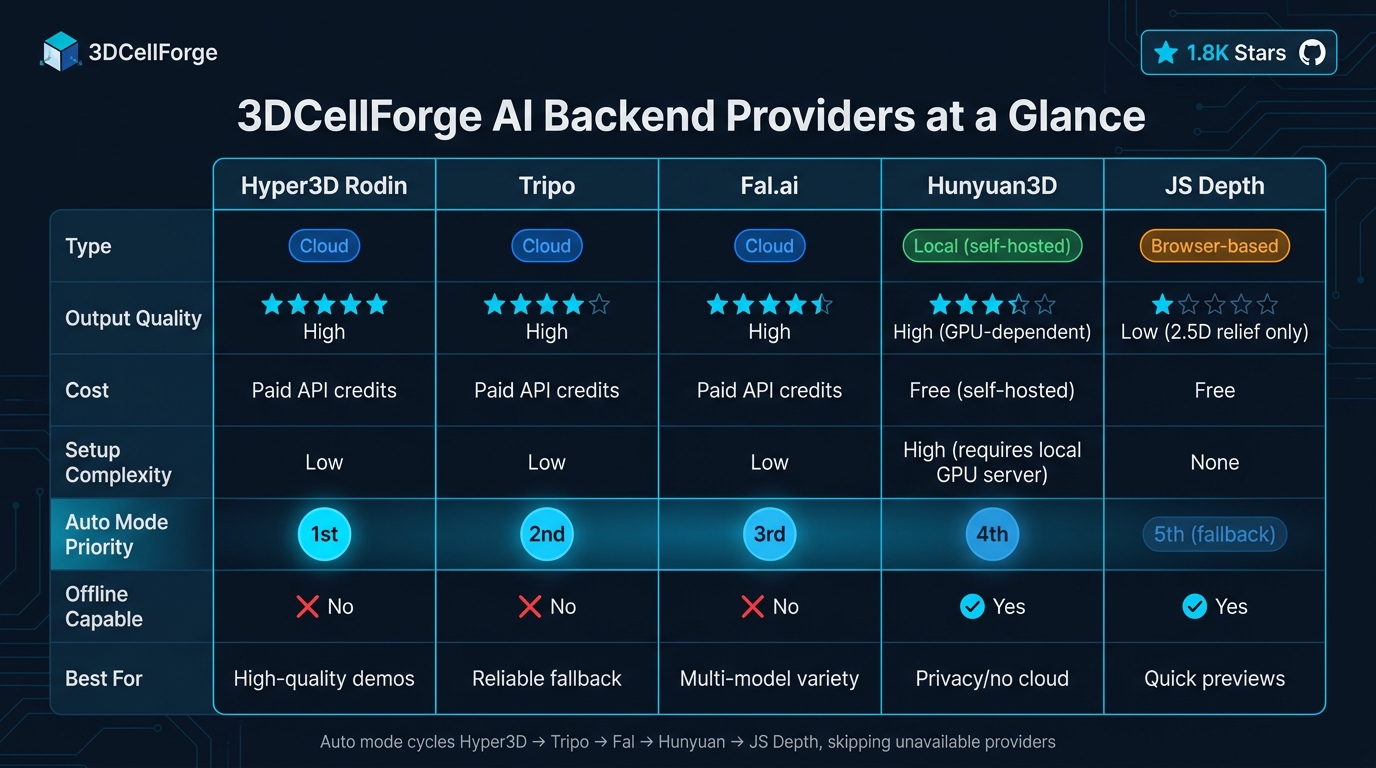
3DCellForge AI backend providers: feature and capability comparison.
Key features of 3DCellForge
The big differentiator is the multi-provider pipeline. You are not locked to one backend. The tool supports Hyper3D (Rodin), Tripo, Fal.ai, Hunyuan3D, and a browser-only JS Depth relief mode. In Auto mode it walks down the list. If Hyper3D fails or the credential is missing, it tries the next one without prompting.
An object-aware inspector pairs every model with an automated quality score based on file size, triangle count, and texture count. Low scores usually point to a weak source image, not a flaky backend.
Demo Mode hides the side panels and runs cinematic camera paths matched to the asset category. As of May 2026 there are six path categories: studio orbit for organics, road push-in for vehicles, flight pass for aircraft, and three more for static props, architecture, and characters.
Technical stack overview
The architecture is two layers. The frontend uses React and Vite, with Three.js and React Three Fiber handling WebGL. Drei provides orbit controls. Framer Motion handles transitions. The backend is a single Node.js file (server.mjs) that proxies APIs, handles multipart uploads, polls task status, and caches GLB files.
| Layer | Technology | Role |
|---|---|---|
| Frontend | React, Vite, Framer Motion | UI, bundling, transitions |
| 3D rendering | Three.js, React Three Fiber, Drei | WebGL stage, orbit controls |
| Backend | Node.js (server.mjs) | API proxy, caching, polling |
| Storage | IndexedDB, localStorage | Asset library, session state |
| AI services | Tripo, Fal.ai, Hyper3D, OpenAI | Image-to-3D, vision analysis |
| Testing | Playwright | Visual regression, layout |
An optional OpenAI vision integration sits at /api/3d/analyze. It classifies the upload and rewrites the prompt before generation, which helps with ambiguous source images. API keys live in .env.local, server-side only.
Strengths and limitations
The hybrid storage model is a real win. IndexedDB persists model metadata across page refreshes. The Node backend caches GLB files in public/generated-models/, which cuts API calls during iterative work and protects your credit balance.
The trade-offs are real too. Cloud dependence on Tripo, Fal.ai, and Hyper3D Rodin means service outages stall your work, and credits add up fast. The local Hunyuan3D option removes the cloud, but you have to run your own API server, which leans hard on consumer GPUs. JS Depth mode is free and instant, but produces 2.5D image reliefs, not full geometry.
The codebase is roughly 75% JavaScript and 25% CSS, which makes it approachable for web developers. WebGL caps the ceiling: heavy scenes with high triangle counts push the GPU harder than a native renderer would.
Installing and configuring 3DCellForge
System requirements
3DCellForge is a web app backed by a Node server, so hardware demands stay light except for one spot: local AI generation.
| Component | Minimum | Recommended |
|---|---|---|
| OS | Windows, macOS, or Linux (64-bit) | Modern 64-bit OS, fully updated |
| Runtime | Node.js LTS + npm | Node.js LTS + npm |
| Graphics | WebGL-compatible GPU | Dedicated GPU (required for local AI) |
| Browser | Chrome, Firefox, Edge, Safari | Latest Chrome or Edge |
| Network | Internet for cloud APIs | High-speed for GLB downloads |
| Local AI backend | Optional | Local Hunyuan3D API server |
WebGL is non-negotiable because rendering runs through Three.js and React Three Fiber. If you plan to run local Hunyuan3D instead of cloud APIs, a dedicated GPU is required; integrated graphics will not keep up.
Cloning and running the project
The project follows a standard Node setup with two processes: backend and frontend.
Run backend and frontend in separate terminals:
# Terminal 1: Node backend
npm run dev:api

# Terminal 2: Vite frontend
npm run dev
The backend runs on http://127.0.0.1:8787. Open the Vite URL from the terminal. To verify rendering works end-to-end:
npm run test:visual
Set up the environment:
cp .env.example .env.local
Open .env.local and add your API keys. The file is gitignored.
Clone and install:
git clone https://github.com/huangserva/3DCellForge.git
cd 3DCellForge
npm install
Configuring AI integrations
Each provider gets its own variable in .env.local.
| Environment variable | Provider | Type |
|---|---|---|
TRIPO_API_KEY | Tripo | Cloud |
FAL_API_KEY | Fal.ai (TRELLIS, TripoSR, Hunyuan3D v2) | Cloud |
RODIN_API_KEY | Hyper3D Rodin | Cloud |
OPENAI_API_KEY | OpenAI vision (/api/3d/analyze) | Cloud |
HUNYUAN_API_BASE | Local Hunyuan3D server | Local |
API_HOST | Backend host address | Config |
Start with one cloud key (TRIPO_API_KEY or FAL_API_KEY) and confirm the pipeline runs. Auto mode rotates through whatever keys it finds.
For local AI, point HUNYUAN_API_BASE at your server (e.g. http://127.0.0.1:8081). Before booting the 3DCellForge backend, confirm the local server exposes /send and /status/:uid. If those are missing, the system silently skips your local backend and moves on.
The OPENAI_API_KEY is optional but worth setting if your source images are ambiguous. It powers the vision classifier at /api/3d/analyze and improves prompt generation before the asset hits the queue.
Using 3DCellForge: step-by-step workflows
Touring the interface
The workspace splits into three rails. Model Library on the left, WebGL stage in the center, and Asset Source rail on the right. Left-click rotates a model. Scroll zooms. Previous generations collapse into a "Saved Assets" section on the left to keep the rail clean.
The top bar toggles between Library and Demo modes. Library shows every asset with previews and task IDs. Demo hides the rails and runs cinematic camera paths. The "Inspect" button opens a drawer with category, material breakdown, and the quality score (driven by triangle count, texture count, and file size).
| Interface component | Location | Primary function |
|---|---|---|
| Model Library rail | Left | Pick active assets, browse saved history |
| WebGL stage | Center | Rotate, zoom, isolate |
| Asset Source rail | Right | Pick AI provider or import local file |
| Generation Queue | Left | Monitor upload, generation, import |
| Inspector Drawer | Contextual | Metadata, material details, quality score |
AI-powered 3D model generation
From the Asset Source rail, pick a provider: Hyper3D Rodin, Tripo, Fal.ai (TRELLIS, TripoSR), local Hunyuan3D, or browser-based JS Depth. Upload your reference image. The Generation Queue updates live as the job runs through upload, processing, and delivery.
If you do not want to think about it, use Auto mode. It cycles through providers in this order: Hyper3D, Tripo, Fal, Hunyuan, JS Depth. It switches automatically when a provider fails or credentials are missing. With OPENAI_API_KEY set, /api/3d/analyze classifies the upload and tunes the prompt before the job enters the queue.
When the model lands, look at the quality card on the stage. A low score (sparse triangles, missing textures, oversized file) usually means the source image needs work, not the backend.
Editing and managing scenes
The Inspector drawer lets you isolate a part of a model, which is the quickest way to catch a missing texture or a malformed mesh. It also tags assets (vehicle, aircraft, organic) so the cinematic camera paths can match. To compare AI output to a hand-crafted reference, drop a .glb or .gltf through "New Upload" on the right rail.
Every model, generated or imported, saves locally. The Library drawer also includes a provider comparison view so you can put outputs from different backends side by side.
Exporting and sharing assets
Polished models export as GLB. Demo Mode collapses the UI and triggers cinematic camera paths keyed to the asset type: studio orbit for organic models, road push-in for vehicles, flight pass for aircraft. Good for client demos without screen-recording a full UI tour.
Working offline or trying to save credits? Cached demo GLBs ship with the repo and load straight into the stage, so you can record screenshots without burning API calls.
Extending and customizing 3DCellForge
Customizing the codebase
The stack (React, Vite, Three.js, React Three Fiber) is modular enough that targeted changes stay contained.
For scene work, gltfjsx is the key utility. It converts a .glb file into a JSX component tree so you can manipulate individual meshes and materials. Pair it with Valtio for proxy-based state, and you can wire up a live color picker or material swapper that updates the scene instantly. The useFrame hook from R3F handles per-frame logic (auto-rotation, floating effects, custom camera animation) inside the render loop.
For UI tweaks, work in src/. Framer Motion is already wired in, so any new drawer or collapsible panel picks up the existing animation style. After layout changes, refresh Playwright baselines with npm run test:visual:update.
| Area | Tools | File or folder |
|---|---|---|
| 3D scene logic | React Three Fiber, Drei | src/ (Canvas components) |
| UI and layout | React, Framer Motion | src/ (Workbench components) |
| AI providers | Node.js | server.mjs |
| API secrets | Dotenv | .env.local |
| Data persistence | IndexedDB, localStorage | src/ (Storage utilities) |
| Visual regression | Playwright | test/ |
Integrating with external tools
3DCellForge exports .glb by default, which drops straight into Blender, Unity, or Unreal Engine without conversion. GLB bundles geometry and textures in one file, so runtime loading is faster than the multi-file .gltf format.
To validate materials before they hit your render pipeline, upload Khronos glTF sample models via "New Upload" and inspect them.
Adding a new AI provider takes two changes: extend server.mjs and add a key to .env.local. The Tripo, Fal.ai, and Hyper3D integrations follow this pattern. Generated models cache in .generated-models/ to save credits.
For APIs that require polling (most GLB generators), implement exponential backoff in your handler. The Tripo integration is a working example. Watch per-provider rate limits if you run several backends concurrently.
For bulk work, the /api/3d/analyze endpoint can pre-tag reference images using OPENAI_API_KEY, which is handy for product catalogs or large asset libraries.
Contributing to the 3DCellForge project
The repo is active and accepts pull requests. Setup for contributors is the same as for users plus a couple of extra steps.
How to contribute
Fork the repo, clone your fork, then:
npm installto pull dependencies.npm run devto start the frontend.npm run dev:apiif your change touches the backend (e.g. a new provider).
Run these checks before opening a PR:
| Command | Purpose |
|---|---|
npm run lint | Code style |
npm run build | Production build sanity check |
npm run test | Unit test suite |
npm run test:visual | Playwright layout and screenshot regression |
If your PR touches the UI, refresh visual baselines with npm run test:visual:update.
Staying updated on project progress
The repo is under active development. Recent work focuses on model studio controls and asset intelligence. Watch the repo on GitHub for issue and PR notifications. The English (README.md) and Chinese (README.zh-CN.md) docs stay in sync and double as informal changelogs. After every git pull, run npm install again in case a backend dependency changed.
Forking and customizing safely
Community forks have already added features like JS Depth relief mode and Rodin providers. Fork drift is the main risk. One public fork was ten commits behind main within a few weeks. Sync regularly.
Two non-negotiable rules when you fork:
- Keep API keys (
TRIPO_API_KEY,FAL_API_KEY,OPENAI_API_KEY) in.env.localonly. That file is gitignored. - Never expose secrets in the frontend bundle.
The project routes provider credentials through the Node backend at http://127.0.0.1:8787 on purpose. Breaking that boundary will leak credentials in any public fork.
FAQs
What do I need to run 3DCellForge locally?
You need Node.js (latest LTS). Clone the repo, run npm install, then npm run dev for the frontend. For image-to-3D generation, copy .env.example to .env.local, add your API keys, and start the backend with npm run dev:api. Keep your .env.local private.
Which AI backend should I use for the best GLB results?
For the cleanest GLB output, use local Hunyuan3D paired with the Hunyuan API backend, or Tripo cloud. Both deliver high-quality geometry with caching so you do not pay for the same model twice.
How can I avoid burning through API credits while iterating?
Two habits. Keep keys server-side in .env.local so they cannot leak into the frontend bundle, and rely on the built-in GLB cache in public/generated-models/. The cache turns repeat lookups into local file reads, so re-running the same prompt during testing costs nothing.
Is 3DCellForge free to use?
The 3DCellForge code is open source. Cloud backends (Hyper3D, Tripo, Fal.ai) charge per generation through their own pricing. The browser-only JS Depth mode and self-hosted Hunyuan3D are free at the cost of weaker output or extra GPU load.
Comments