
I spent a week trying to get Claude to generate a Raycast extension that didn't feel like a web app in disguise. The results were frustrating. Sure, the code ran, but the experience was off. Keyboard shortcuts felt tacked on, transitions were clunky, and the UI lacked that polished, native look Raycast users expect.
That's where native-feel-skill comes in. It's a Claude Agent skill designed to close the gap between functional and native-like. By reverse-engineering Raycast's design principles, it turns vague AI outputs into something that actually feels built for macOS. Think sub-500ms load times, proper NSVisualEffectView styling, and HUD feedback that doesn't scream "Electron."
This post walks through what native-feel-skill offers, what it doesn't, and whether it's worth the setup hassle for anyone building Raycast extensions or similar tools.
Why native-feel-skill Matters for AI Developers
What is native-feel-skill?
native-feel-skill is a Claude Agent skill designed to make AI-generated desktop tools feel like true native applications, avoiding the telltale signs of web apps. Its architecture is built on four layers: a native shell (using Swift/AppKit for macOS or C#/WPF for Windows), a system WebView (using WKWebView or WebView2), a Node.js backend, and a Rust core bridged through UniFFI. This setup allows smooth integration with Claude Code, enabling consistent cross-platform UI and WebView interactions.
A standout feature of this skill is its 75-item audit checklist, which identifies and flags web-style issues. Examples include the use of cursor:pointer on list rows, web-style modal overlays instead of native sheets, non-transparent window backgrounds, and hardcoded brand colors where system defaults should be used. Most Electron apps show 6 to 8 of these issues, with fixes typically requiring anywhere from 5 to 30 minutes per issue.
Now, here is how reverse-engineering Raycast influenced the design principles behind this skill.
How Reverse-Engineering Raycast Shaped the Skill
Raycast served as the benchmark for native software standards, with its sub-500ms cold start times and memory usage under 500MB. By reverse-engineering the Raycast Beta.app binary (v0.60.0) through non-invasive methods and reviewing Raycast's public technical documentation, several key insights emerged. These included WebView survival flags and memory management techniques that are absent from official WebKit or WebView2 documentation. These findings directly shaped the skill's standardized IPC contract, which uses a Coordinator/EventHandler pattern. This approach relies on a single typed schema and supports code generation for Rust, Swift, and TypeScript.
Raycast's philosophy is captured in their own words:
"We're not a web app with some native hooks sprinkled on top. We're a native app that uses web for its UI." (Raycast)
This mindset guided the development of native-feel-skill, prioritizing a seamless integration of native and web technologies. As yetone, the creator of native-feel-skill, explains:
"Place the seam at the rendering surface. Share above the WebView, diverge below it; this is the only altitude where both DX and native feel survive." (yetone)
Who Should Use This Skill?
native-feel-skill is best suited for projects that require high performance and polish, rather than lightweight utilities. If your project demands cold start times under 100ms or memory usage below 150MB, you might want to consult the decision tree for light tool scenarios.
This skill is aimed at architects and technical leads working on launchers, productivity suites, or AI workspaces. These are tools where users spend significant time and are quick to notice deviations from native behavior. If your app needs to meet a higher standard than typical Electron projects and pass the "30-second skeptical user test", native-feel-skill provides a structured, reliable foundation with design patterns validated by Raycast.
With these principles in mind, the next section covers Raycast's design methodology.
How Raycast Was Studied to Build native-feel-skill
Raycast's Core Design Philosophy
Raycast's engineering revolves around a strict 50ms latency limit.
"50ms is the speed threshold. Users perceive any latency above 50ms; treat this as a hard engineering constraint, not a guideline." (Raycast Team)
This principle shapes every decision in the app's design. Keyboard shortcuts like Cmd+1, Cmd+2, and Cmd+K are displayed directly within the results list, making them immediately visible without requiring users to dig through documentation. The UI prioritizes speed by rendering instantly with cached data, while heavier operations run asynchronously in the background. The search bar automatically focuses on launch, employing fuzzy matching combined with frequency and recency ranking to optimize for quick, keyboard-driven navigation. Raycast also uses native macOS components like NSVisualEffectView, SF Symbols, and system accent colors to create a sense of familiarity and trust, reinforcing its integration into the macOS environment. These performance-driven principles serve as the foundation for native-feel-skill's design.
Documenting Raycast's UX and UI Patterns
To understand Raycast's approach, the study also dissected its dark UI design. Instead of pure black, Raycast opts for a deep charcoal (#1C1C1E) as its base background color. This choice reduces eye strain while making elevated elements more distinct. Elevation steps, such as cards and panels, increase luminance by 6 to 8 points, creating depth without relying on heavy borders. For defining edges on dark surfaces, Raycast uses a subtle 1px light border (rgba(255, 255, 255, 0.08)) instead of traditional box shadows. Translucent panels enhance background colors with a 20px blur and a 180% saturation boost.
"The saturate(180%) is the detail most implementations miss. It pumps the saturation of content behind the panel. That's what gives it the jewel quality." (SeedFlip)
Typography in Raycast relies on color and opacity to establish hierarchy. Secondary text appears at roughly 55% white opacity, while accent colors are used sparingly. Less than 10% of the interface uses accent color, which maintains a clean, focused aesthetic. These insights were meticulously documented, forming the groundwork for translating Raycast's visual and interaction principles into a structured framework.
Turning Observed Patterns into a Reusable Framework
The patterns identified in Raycast's design were formalized into reusable guidelines and resources. SKILL.md and DESIGN.md were created to detail these patterns, including their trigger conditions and visual style rules, all aligned with macOS conventions.
The table below outlines how key Raycast patterns were adapted for native-feel-skill:
| Raycast Pattern | Translation in native-feel-skill | Method |
|---|---|---|
| 50ms Rule | Performance Constraint | Async data loading with immediate UI rendering |
| Cmd+K Action Panel | Contextual Actions | Standardized ActionPanel TSX component |
| Vibrancy/Blur | macOS Native Aesthetic | NSVisualEffectView / .ultraThinMaterial styling |
| Fuzzy Search | Search-First Pattern | Auto-focus search on launch with fuzzy matching |
| HUD Feedback | Non-blocking Toasts | showToast API with auto-dismissal |
To ensure consistency, reference files (api.md, ui_components.md, and best_practices.md) were generated directly from Raycast's official documentation. These files maintain the original code structure and component signatures. For example, the ActionPanel pattern enforces a clear hierarchy: the primary action is triggered with Cmd+Enter, secondary actions are accessed via the Cmd+K panel, and successful commands automatically call popToRoot to exit the flow without requiring extra user input.
A Tour of the native-feel-skill Repository
Key Files and Their Purpose
The repository is structured in a way that makes navigation straightforward. The SKILL.md file serves as the main entry point, featuring YAML frontmatter for auto-discovery, a concise overview of the design principles, and a quick-start checklist. This checklist spans both web artifacts (like React/HTML) and native frameworks such as Electron and Tauri. The core of the repository's functionality lies in the references directory, where each markdown file focuses on a specific design area:
- layout-and-composition.md: Covers structural rules, including the placement of top bars, sidebar navigation, and draggable window zones.
- interaction-patterns.md: Details interaction elements like keyboard shortcuts, action panels, toasts, and popovers.
- visual-design.md: Explains visual elements, including support for light/dark modes, SF Pro typography, and vibrancy effects using
backdrop-filter. - ui_components.md: Focuses on design patterns for command palettes and list views.
The assets directory contains templates and boilerplate code, while the scripts directory includes automation tools. Dependency management and versioning for the skill are handled through package.json. With this structure in mind, the next section examines what native-feel-skill is designed to do, and where it draws the line.
What the Skill Does and Doesn't Do
native-feel-skill provides design guidelines rather than direct system control. Its purpose is to ensure native-like performance and user experience by defining how elements should look and behave. For instance, it specifies traffic light window controls, a draggable 50px top zone, and toast feedback. However, it doesn't directly manage system elements beyond what the Raycast API or selected frameworks allow.
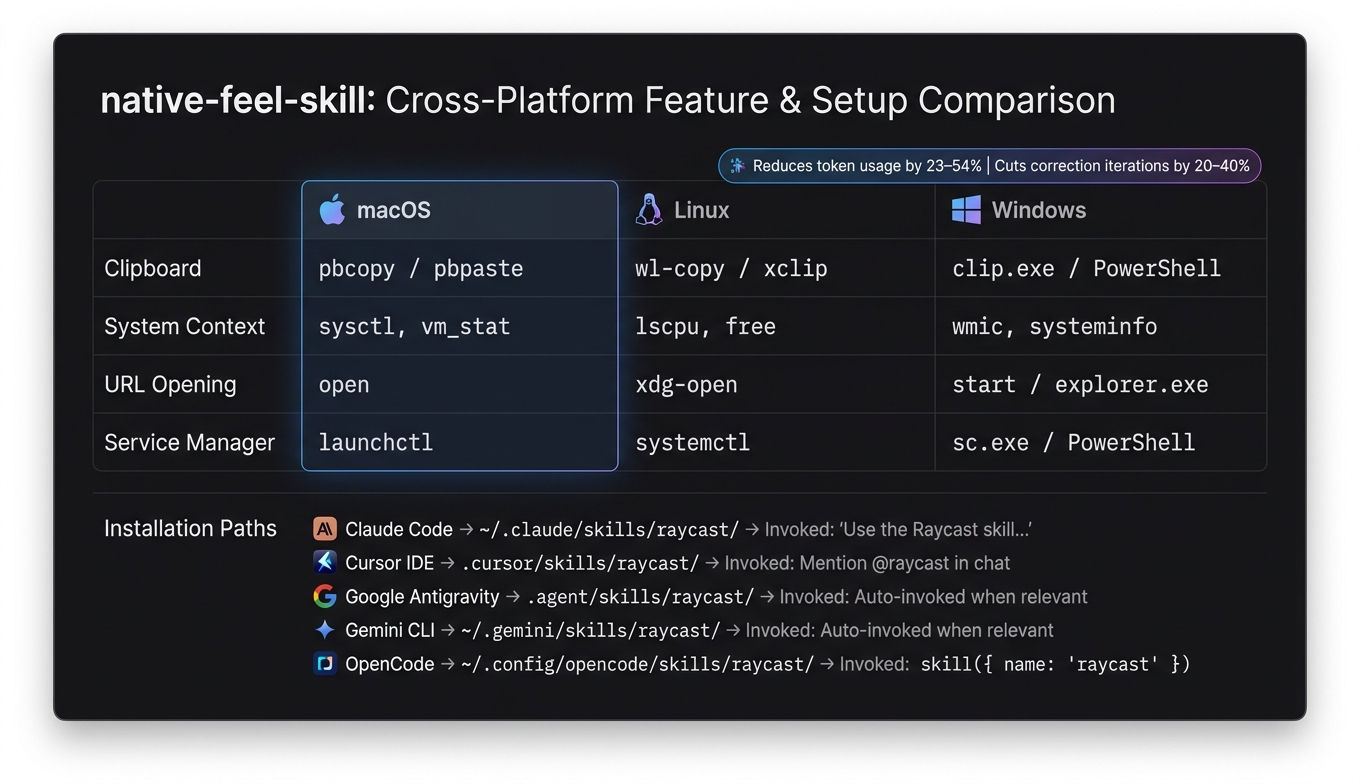
Because the skill primarily targets macOS, developers working on other platforms may need to adjust certain patterns. For web-based artifacts, features like native window chrome (e.g., 10px rounded corners for windows and 8px for cards) must be manually simulated. While the tool provides specifications, implementation is left to the developer. By using this structured approach, the skill has been shown to reduce token usage for tasks by 23% to 54% and cut down correction iterations by 20% to 40%.
Setting Up Your Development Environment
Once you're familiar with the repository structure and its capabilities, you can begin setting up your environment. First, install Node.js (v18 or later) and npm. Then, initialize the Raycast API by running:
npx @raycast/api@latest
You'll also need an AI coding assistant compatible with the Agent Skills open standard. To install the skill, clone the repository into the appropriate directory for your platform:
| Platform | Installation Path | Invocation Method |
|---|---|---|
| Claude Code | ~/.claude/skills/raycast/ | "Use the Raycast skill..." |
| Cursor IDE | .cursor/skills/raycast/ | Mention @raycast in chat |
| Google Antigravity | .agent/skills/raycast/ | Auto-invoked when relevant |
| Gemini CLI | ~/.gemini/skills/raycast/ | Auto-invoked when relevant |
| OpenCode | ~/.config/opencode/skills/raycast/ | skill({ name: "raycast" }) |
After cloning the repository, restart your assistant or reload your workspace to ensure that SKILL.md is detected. The skill employs progressive disclosure: initially, only the name and description are loaded to save tokens. The full SKILL.md file and its reference documents are only loaded when the skill is activated.
Using native-feel-skill to Design Native UIs
Loading the Skill in Claude Agent
To get started, make sure Claude can locate the SKILL.md file. The folder must be in kebab-case, and the file name should be exactly SKILL.md. Any deviation, such as a typo, will cause Claude to ignore the skill without any error message.
The SKILL.md file uses YAML frontmatter to define three key elements:
description: This helps with auto-triggering.allowed-tools: This prevents Claude from repeatedly asking for permission to access files.context: This allows you to inject design reference files when the skill is invoked.
For design-related tasks, set allowed-tools to include at least Read, Write, and Glob. This ensures the agent can move through the references directory without interruptions. Once the setup is complete, you can activate the skill manually using /native-feel-skill or let Claude trigger it automatically when your prompt mentions Raycast-style UI patterns.
With the skill loaded, you can use it to create a functional command palette.
Building a Command Palette with native-feel-skill
A common application of this skill is designing a command palette, which is the central interaction point in Raycast-style UIs. Start by running:
npx @raycast/api@latest
This initializes the extension. Choose a template, either typeahead or list/detail, that aligns with Raycast's search-and-action model.
From there, the file ui_components.md provides detailed guidance on design elements like corner radii and spacing rules. For macOS fidelity, use the font stack -apple-system, BlinkMacSystemFont, "SF Pro Display", "SF Pro Text". Avoid substituting system-ui, as it won't match macOS standards.
Every primary action should include a keyboard shortcut with visible feedback. For non-view actions, use the showHUD("Success") pattern. When implementing data fetching in list views, rely on useCachedPromise from @raycast/utils. This keeps the interface responsive as results load.
Reviewing and Refining Your Designs
Once your command palette is set up, use the audit tools in native-feel-skill to fine-tune your design. The most frequent mistakes that disrupt a native feel include:
- Missing drag zones.
- Poorly designed color schemes that simply invert for dark mode rather than using tailored palettes.
- State transitions without animations.
Ensure the top window stays uncluttered to maintain draggable functionality.
For a clean and efficient design audit, set allowed-tools to Read, Grep, and Glob. This minimizes distractions during the refinement process. Use an atomic refinement approach, focusing on one component at a time. This keeps the agent's context targeted and ensures quick correction cycles.
Raycast: Building my first extension with Claude Code
Customizing and Extending native-feel-skill
native-feel-skill: Cross-Platform Setup and Feature Comparison
This section focuses on how to tailor and expand native-feel-skill to suit different platforms and workflows, building on the earlier discussion of its design principles.
Adapting the Skill for Windows and Linux
Since the skill is built with macOS in mind, it relies on specific tools like macOS font stacks, clipboard utilities, and service managers. These need to be replaced when running on Windows or Linux. The best approach is to implement centralized platform detection: a single utility that determines whether the runtime environment is macOS, Linux, WSL, or Windows. This utility should then route system prompts and tool calls accordingly, avoiding scattered conditional checks like if (process.platform === 'darwin') throughout the codebase.
For clipboard operations, map commands to the appropriate platform utilities: pbcopy for macOS, clip.exe for WSL, and wl-copy or xclip for Linux. This keeps the user experience consistent, regardless of the platform.
In August 2025, Raycast contributor sebdanielsson showcased a way to reduce dependencies by replacing the js-base64 library with Node.js's native Buffer and switching a custom open implementation for the built-in method from @raycast/api. This reduced dependencies from nine to two, streamlining the project.
Linux users should be aware of a limitation on Wayland: global shortcuts may not function if the compositor (e.g., GNOME) doesn't support the GlobalShortcuts portal. Be sure to document this in your fork's SKILL.md file to avoid confusion.
| Feature | macOS | Linux | Windows |
|---|---|---|---|
| Clipboard | pbcopy / pbpaste |
wl-copy / xclip |
clip.exe / PowerShell |
| System context | sysctl, vm_stat |
lscpu, free |
wmic, systeminfo |
| URL opening | open |
xdg-open |
start / explorer.exe |
| Service manager | launchctl |
systemctl |
sc.exe / PowerShell |
Adding New Patterns to the Skill
The repository is organized with a root SKILL.md file for core instructions and a references/ directory containing markdown files for specific categories, such as ui_components.md and interaction-patterns.md. When introducing a new pattern, both areas should be updated.
To contribute:
- Fork and clone the repository.
- Update the relevant file in the
references/directory with clear headings and TypeScript/React snippets for demonstration. - Add the new pattern to the "Common Patterns" or "Quick-Start Checklist" section in
SKILL.md. This ensures the agent prioritizes it during use. - For keyboard shortcuts, define cross-platform mappings inline (e.g.,
macOS: { modifiers: ["cmd"], key: "k" }) instead of relying on defaults. - Test the changes by loading the updated skill into your development environment (such as Claude Code or Cursor). Run prompts like "Create a UI using the [New Pattern Name]" to ensure functionality before submitting a pull request.
By following this process, you ensure the skill remains adaptable and effective across various design-to-code workflows.
Using native-feel-skill as Part of a Larger Workflow
The skill installs into platform-specific directories, such as ~/.claude/skills/ for Claude Code and .cursor/skills/ for Cursor IDE. Its Model Context Protocol (MCP) allows it to work across multiple clients, including those using GPT-4o or Gemini.
In design-to-code workflows, native-feel-skill can be used during both the component generation and review phases. For instance, it can scaffold components and then be re-run during reviews to catch regressions. Permissions like Read, Grep, and Glob ensure it operates effectively without requiring a full design system. Instead, it functions as a stateless reference tool that supports ongoing development.
For automating interactions with native apps beyond Raycast extensions, prioritize accessibility (AX) primitives like AXPress and AXSelectedRows. These methods work silently in the background, allowing users to continue their tasks uninterrupted.
"Your actions do NOT move the user's cursor, steal keyboard focus, or switch Spaces. The user can keep typing in their editor while you click around in Safari in another Space." (NousResearch)
This principle helps the skill integrate smoothly into CI pipelines or design review processes, enabling audits without disrupting the developer's active work environment.
FAQs
How do I install and trigger native-feel-skill in Claude Code?
Clone the yetone/native-feel-skill repository into ~/.claude/skills/native-feel-cross-platform-desktop/, then restart Claude Code. The skill auto-activates when your conversation touches cross-platform desktop architecture, WebView quirks, or Raycast-style apps. You can also invoke it manually with /native-feel-skill.
What's the fastest way to audit my Raycast UI for "web app" artifacts?
Run the 75-item ship audit shipped with native-feel-skill. It flags the most common giveaways: cursor:pointer on list rows, web-style modal overlays instead of native sheets, non-transparent window backgrounds, and hardcoded brand colors where system defaults should apply. Most Electron apps trip 6 to 8 of these items, with 5 to 30 minutes of fix time each.
How do I adapt macOS-first patterns to Windows or Linux?
Use a single platform-detection utility that routes clipboard, system context, URL opening, and service manager calls to the right runtime tool (pbcopy on macOS, clip.exe on WSL, wl-copy or xclip on Linux). Avoid scattered process.platform checks. On Wayland Linux, document that global shortcuts depend on the compositor supporting the GlobalShortcuts portal.
Does the skill work with Cursor, Gemini CLI, or OpenCode?
Yes. The Agent Skills standard is supported across Claude Code, Cursor IDE, Google Antigravity, Gemini CLI, and OpenCode. Each client has a different install path (for example .cursor/skills/raycast/ for Cursor) and invocation style, but the underlying SKILL.md and references directory are identical.
Comments